Quick Start
This document can help you quickly get started with AtomGit, including registration, login, creating a project, committing code, etc.
Register and Login
-
Access the official website: Visit official website, click on 「Register」 in the top right corner of the homepage, and fill in the information as prompted to register an account.

-
If you already have an account, click on 「Login」 in the top right corner, and you can choose to log in via SMS or password. It also supports third-party account login such as CSDN, Hbuilder, GitHub, Gitee, and WeChat.

-
Here is the video tutorial content:
Create Project
-
After completing registration or successfully logging in, click on 「New」 in the top right corner of the homepage and select 「New Project」 to create your own project.

-
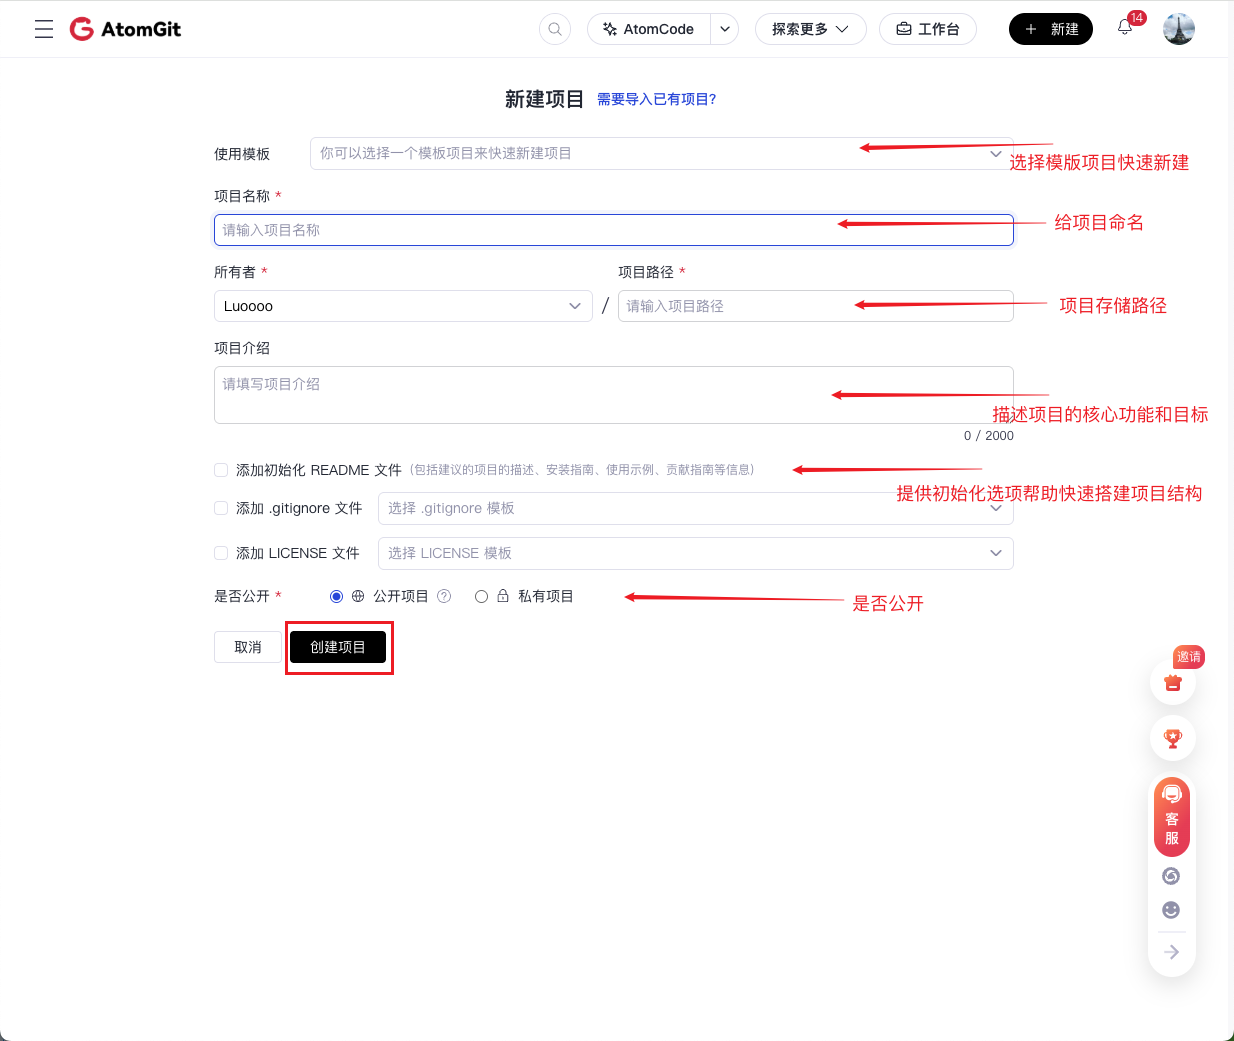
Explanation of some information that needs to be filled when creating a new project:
- Project Repository Type: AtomGit supports different repository types for storing code and managing versions.
- Code Repository: Used to store and manage the source code, script files, and related development resources of the project.
- Model Repository: Used to store model files and related information for machine learning or deep learning.
- Dataset Repository: Used to store structured or unstructured data, usually the datasets required for AI/ML model training and evaluation.
- Set Project Visibility: Controls the access permissions of the project.
- Public Project: Anyone can access it, suitable for open-source projects.
- Private Project: Only project members can access it, suitable for enterprise or personal projects.
When choosing "Public" for an open-source project, be careful to protect sensitive information.
- Initialize the Project: When creating a project, AtomGit provides the following initialization options to help quickly set up the project structure:
- Add an initialized README file: The README is the home page document of the project, used to introduce the project content, functions, and usage methods.
- Add a .gitignore file: Used to ignore files that do not need to be uploaded to the repository, such as local environment configuration, log files, compiled results, etc.
- Add a LICENSE file: A LICENSE file declares the usage rights and open-source license of the project.
-
After filling in or selecting all the information, click on 「Create Project」 to create your first project.

Commit Code
After the repository is created, we can submit code through the following process:
-
Clone the project to local
Before cloning the project, make sure that the local Git global configuration is completed:
git config --global user.name “Username or nickname”
git config --global user.email “Email address”
Copy the project address and clone it locally:
git clone project address
You can also go to the project page and click on 「Clone」 and follow the instructions to clone:


-
Create a branch
When developing in a company or working on multi-person collaboration, we often create multiple branches.
- Execute the following command to create a new branch:
git branch <new branch name>   # Create a new branch
git checkout -b <new branch name>  # Create and switch to the new branch directly
- You can also click on the current branch on the project page and then click 「New Branch」 to quickly create a new branch:


A successful branch creation indicates that a new branch has been successfully created:

-
Modify code and submit
- Using 「VSCode」 to modify 「README.md」 file as an example:


- Click on the right side of the project page 「Commit Count」 to view the commit history:


- After completing the above process, you have successfully modified the code and submitted it!
Submit PR (Read if you are collaborating)
Pull Request (PR) is a code collaboration mechanism. It allows developers to submit code changes to the main branch or other branches, and these changes can be merged through code review, testing, and discussion. In enterprise development or multi-person collaboration, we need to submit PRs;If you are a project manager or individual developer, you don't need to submit PRs.
- Click on 「Pull Request」 on the project page, then click on 「New Pull Request」 in the top right corner.

- After selecting the corresponding Source Branch (the branch where you modified the code) and Target Branch (the branch where you want to submit the code), click on 「Next」.

- After filling in the PR title and description, click on 「Create」 to successfully create a PR, notifying the relevant manager to review the PR. Once the review is passed, the code can be synchronized to the merged branch, and the PR process ends.

Common Git Commands
The following are common Git commands that can help users quickly master basic Git operations.
git init # Initialize a new Git repository.
git remote add origin <remote repository address>  # Add a remote repository
git remote -v                        # View remote repositories
git add <filename>   # Add a specific file
git add .          # Add all changed files
git commit -m "Commit message"   # Commit the changes in the staging area and note the commit information
git log                  # Display detailed commit history
git log --oneline        # Concise mode
git status  # View the status of the working area and staging area.
git branch               # View branches
git branch <branch name>       # Create a new branch
git branch -d <branch name>    # Delete a branch
git checkout <branch name>    # Switch to a branch
git checkout -- <filename> # Restore the file to the state of the latest commit
git switch <branch name>       # Switch branches
git switch -c <branch name>    # Create and switch to a new branch
git merge <branch name>       # Merge the specified branch into the current branch
git pull      # Pull code from the remote repository and merge it into the current branch
git push origin <branch name>   # Push local changes to the remote repository
git reset --soft HEAD~1   # Undo the last commit but keep the changes
git reset --hard HEAD~1   # Undo the last commit and discard the changes
git stash                 # Save uncommitted changes
git stash pop             # Restore the stashed changes
git fetch                 # Fetch updates from the remote repository but do not merge